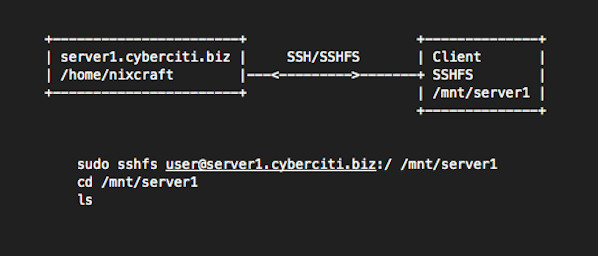
Mounting remote directories over SSH from Windows, Linux and the mac.

I have a Linux server that I like very much. It’s at the hart of my home network and it houses all the data and projects I’m working on. My music collection, the podcasts I’ve downloaded, textfiles and scripts I’m working on and so forth.

The downside is that I don’t always have access to these files. I work on a variety of operating systems (A Windows laptop for work, A Mac for my creative splurges and a Linux workstation to fool around with). There are several solutions to “dail in” to your home network of course but somewhere I’ve found SSH to be one of the simplest ways to access remote machines, tunnel traffic and … access files.

Sometimes you want remote files to behave like local ones.

The problem is that sometimes you want to have your remote files and folders behave just like your local files and folders, without having to worry about vpn’s, netbios or FQDN names of certain files. You just want the data on your remote machine to act like data on your local one. Enter SSHFS.

SSHFS is based on SSH, a simple elegant and secure protocol that not only lets you connect to a remote server to run commands in a terminal environment, it’s also a pretty good poor-mans VPN you can tunnel all your tcraffic through (via SSHuttle). It’s also good to copy over files via secure ftp (with Filezilla for example). But copying files back and forth isn’t handy. You want real-time access to the juice man. Let’s get you fixed up and mount your remote linux folders, natively into your filesystem on Windows, Mac and Linux.

SSHFS on a Linux client.

SSHFS on Linux
On your Linux client you need to install sshfs
sudo apt instal sshfs

sudo apt instal sshfs

Then you create a directory on your local machine where you want to mound the files
Once installed you connect to your remote machine with the command

sshfs username@remotemachine:/directoryonremotemachine /directoryonlocalmachine

SSHFS from a MacOs client.

SSHFS on Mac
MacOs does not have sshfs capabilities by default but these can easily be installed via Brew
When brew is installed you can install sshfs with the brew command.
To mount your remote directory just use the same command as on Linux/

 brew install sshfs 
sshfs username@remotemachine:/directoryonremotemachine /directoryonlocalmachine

SSHFS from a Windows Machine

That also works but it does require a little more work to get it done AND Windows won’t let you mount to a folder nativey but points you to a driveletter instead.

First off install the following two applications:
sshfs-win
WinFsp

Next all you need to do is open a command line window and enter the following command.
net use .<yourdrive>: \sshfs\yourusename@remotehost….\directorystartingfromroot

 net use x: \sshfs\me@thedeathstar.empire....\deathstarplans R3belsRscumm 

In the end.

At the end of the day using SSHFS is a great way to quickly access files on a remote Linux system while having the files and folders integrated into the filestructure of whatever operating system you use. The additional encryption provided by SSH gives you good security. Both on Linux and on the mac you will be asked to authenticate with your password. If you don’t want to do that you setup ssh key exchange (see here) on how that is done. You can enter the commands in a script that you can just run (like a logon script).


Beware then when you are doing this on Windows your logon script might contain your login and your password for the remote system in clear text. So keep that somewhere safe.

Related Posts

KW1202 – One Linux to Rule Them All

One Linux

Sometimes the way to achieve “less” is to make more use of the things you already have. If the thing you already have is a fairly powerful old laptop, what you may find is that it makes the perfect home server. This week Knightwise tells us all about the laptop with the new lease on life.

Credits

Episode produced by Keith Murray
Home screen picture courtesy of PixaBay


Related Posts

KW1105 60 Minutes of Common Sense

The knightwise.com podcast is back this week with a splash of cold water and a dose of plain old common sense. This week we talk about some strategies to keep you, your devices and your data out of nefarious hands. Vigilance, my friends.

Links

Music

Credits

Related Posts

Building a simple Offsite backup server with an EEEpc and Bittorrent Sync.

Some gadgets are just hard to throw out. Perhaps you keep hanging on to them because you have this plan of “using them someday” for “some project”. Perhaps you keep hanging on to them because of nostalgia. Whatever reason you might choose, those geeky gadgets that keep occupying that box in your office aren’t getting any younger. Why not put them to good use ?

Lets take 2 items in MY junk-box as an example. An aging Asus EEE 701 Netbook PC that I have been hanging onto because of sentimental reasons. (I smuggled it in from the US way before these babies were available in Belgium) Its keyboard is broken and its low specs when it comes to storage, memory and cpu power aren’t helping it in finding something useful to do these days. The second item is my first 1tb external hard drive. I haven’t thrown this one out because its on my ‘for-some-project-some-day’ list. Its been on the list for 2 years now … So lets smash them together and turn them into a Remote backup solution using open source software and Bittorrent technology.

1013636_10152730916287912_8486272877834744564_n

Step 1 : Turn the EEEpc into a headless server.

I downloaded the Image for Ubuntu’s ‘minimal installer’ off the net and have had it kicking around on an old USB stick for a while now. Because of its small footprint its ideal to do ‘light’ installations of Ubuntu because you can choose which components you want to install. I chose the ‘minimal Ubuntu server’ and the SSH server component. When the installation was complete I rebooted the laptop and hooked up the external USB drive (that I had formatted in one big FAT32 partition)

Step 2 : Install Webmin and mount the drive.

Because I was going to use my external hard drive to store my remote backups on (the EEEpc doesn’t have enough storage) I needed to be sure it was always mounted correctly if my little laptop should have to reboot. So instead of messing around with stuff like FStab config files I installed Webmin. (a Web-based interface to your Linux server). Using the ‘Disk and network file system’ menu I mounted the external drive into a folder called ‘backup drive’ that I had created in my home directory. This way I was sure that the external drive was always mounted correctly in the same folder.

Links : Howto install Webmin.

Step 3 : Install Bittorrent Sync.
Next up I installed a copy of Bittorrent Sync both on my local server and on the old eeePc. Following THIS tutorial lets you install Bittorrent Sync and configure the Web interface to be accessible from all over your network. (So make sure you choose a very secure administrator password). When installing Bittorrent sync this way, you are also sure the service always starts up when your computer reboots.

Links : Howto install Bittorrent sync. 

After the installation was complete I surfed to the Bittorrent web interface of my home server (source system) in one tab, and to that of my EEEpc (remote destination system) on another one.

Step 4 : Share a folder on your Source system.

Now it was pretty smooth sailing. On the Bittorrent web interface of my SOURCE machine I made a bittorrent share of each folder I wanted to backup remotely. I right clicked “properties” once the folder was created and copied the ‘READ ONLY’ secret.

Step 5 : Enter the key for the shared folder on your remote destination system.

Next up I went to the tab of my ‘remote destination system’ and entered the READ ONLY key. I selected a folder on my external drive where the files needed to be synced towards. (in my /home/backupdrive/ directory)

Step 6 : Do the initial copy

After repeating the process above for all the folders I wanted to ‘sync remotely’ I just had to wait for the initial copy to complete. After that it was time to pickup the EEEpc and the External drive and bring them to their new (remote) home. I hooked the EEEpc up to the network, started up the machine and … that was that … headless remote backup solution done.

Epilogue.

Because Bittorrent sync doesn’t care about open ports or anything I didn’t have to mess with the router on the remote end of my backup solution. There were no ports to forward and even a static IP was not required for the remote machine. Just connect it , fire it up and .. boom. Using the ‘read only’ secret is an insurance that changes to my files are only synced one way : From the source to the remote system (and never the other way around).

You can expand this setup (and increase the security at the remote end) by syncing over encrypted ZIP files. That way people can’t access the data should your system be compromised.

In the end its a great simple way to use an old system (you can even use an old laptop with a broken screen for this) and give it a new lease on life. The setup is simple, the interfaces are web based and the whole setup is perfect for a remote backup destination at your parents or in laws.

So secure your data and put those old clunkers back in action !

Related Posts

kw905 : Life on a Chromebook.

We deep dive into the world of Chromebooks and find an answer to the question : Can you survive on a Chromebook. We walk you through the possibilities and limitations of the Chromebook. We enlighten you  on how to use it for work, connect back to your home network and how to use your Chromebook to entertain you. If thats not enough we go beyond the design specifications and sideload Linux on your Chromebook turning into a low budget sliders dream machine. All of that and more .. in Kw905 : Life on a Chromebook. Catch the live recording of this podcast in the Youtube video below and see if you can catch Sulu the dog as our Podcast assistant.

Shownotes.

  • The Acer C730
  • First impressions
  • Hardware – Software
  • Taking the Chromebook to work (Article)
  • Using the Chromebook to entertain you (Article)
  • Connecting back to your home network via a Socks5 proxy over SSH (Article)
  • Dual Booting your Chromebook with Linux (Distroshare.com)
  • Sideloading your Chromebook with Crouton (Youtube instruction video)
  • Epilogue

Related Posts

Connect your Chromebook to your home network over SSH.

This week i’m testing out my new Acer A730 to see just what it can do and how far we can take it. One of the frustrations I bumped in earlier this week was that there were limited options when it came to “Phoning home”. Setting up encrypted tunnels to your home network over the internet using VPN or Proxy connections is something we should consider when using public Wifi hotspots.

With the Chromebook relying completely on some wifi connection on a (perhaps foreign) network I was disappointed to find that the only protocols that were supported were L2TP and OpenVpn. Not a bad set to choose from but not something that I had setup on my home network.

Previously I used an SSH server and the SSHuttle app to tunnel my internet, dns and even network traffic over a Socks5 proxy to my home network. I wondered if this would be possible with the Chromebook. Turns out it is ! Let’s start cooking.

To get this little piece of magic working you need 3 things. A : One SSH server (A linux machine) on your home network that has at least one port open to the internet. B : The Secure Shell app from the Chrome store. C : The Switchy-Sharp extension.

Setting it up is quite easy. Lets say we opened up port 8800 of our SSH server to the internet. Setup Secure Shell to connect to the your home SSH server with the additional option to create a port forwarding tunnel on lets say port 8800 with the option -D 8800

img_546b9a0a17c9d

Next we setup Switchy Sharp as to use the SSH connection (and port 8800) as a socks 5 proxy.
switchy

All you need to do next is Connect to your home SSH server and use the Switchy Sharp extention in your browser to use the connection. The Chromebook will tunnel all http and https requests AND the DNS queries through the tunnel. That way 95% of your Chromebooks traffic (we aren”t a 100 percent sure about what protocols any other apps you have might use) are piped through a secure tunnel. You don’t only get to connect to your home network (to open up any web-interface to any device or server you have) but also you get to do it all ‘in private’

Links.

Related Posts

Chrome Week : Our favourite Chrome apps (Part 2)

 We already told you about some of our favourite Chrome apps in the first post of this series, So this time its time to dive a little deeper into applications/extensions that will actually help you to do things for which you otherwise would need an application. We have broken them down into some easy categories for you to follow.

Entertainment.

I think the days we actually stored music on our devices and played back those files are as obsolete as shouting “Put the needle on the Record” at some teen playing a DJ gig with his laptop. Since we are talking about Chrome extensions here, I can only assume that you have a connection to the internet all the time.  With so many free audio streaming services available the only thing that is keeping you from playing the latest Shakira album over and over (and over) is your bandwidth cap.  Some of the Chrome extensions we love here are  Spotify and Soundcloud. Sure you get some commercials when you use the free service, but that’s just like real actual radio. If you should be in the business of running your own PLEX server at home and would like to stream your (audio and video) content on your Chromebook ? Try the Plex app. (But do make sure that you open up the right ports on your router if you want to access your server from the outside).

Production.

But what about when listening to music is not enough ? There are a couple of great apps out there that will actually help you MAKE some music. From simple voice recording with “Voice Recorder” to rather complex audio mixing with Audiotool. Want to annoy your friends by badly mixing 2 tracks together using an online DJ mixer ? Try Until AM.

Connecting to other machines.

But what if your Chromebook isn’t enough and you need to connect to other systems and devices ? When you need an SSH session to your Linux machine (or your mac) at home “Secure Shell” is without a shadow of a doubt one of our favourite applications. It reminds us of the popular Windows terminal client PUTTY only 4983 times better. It remembers sessions you have saved to your servers across multiple sessions of Chrome, so you always have your connections at your fingertips. If you need to go a step further and dive into the graphical side of things, you might want to try “Chrome RDP” to connect to your  machines running the Remote Desktop Protocol. 

unnamed

Productivity.

Ok, The only reason you bought a Chromebook (or use Chrome) is so you can spend hours on 9gag and Reddit. So its a good thing we even dug up some productivity apps. Outlook.com might be a little bit of blasphemy in this Gmail centered environment, but the Chrome app DOES get you to your mailbox environment even though its not controlled by the “Big Bad G”. Another pretty simple Chrome app we found is called Workflow. Workflow lets you organise your tasks into lists and sub-lists. It’s more like a text based mindmap but it does give you a pretty good overview of what you are working on and what subtasks are involved. Speaking of “simple” and “text based” we found “Writer” to be a very nice distraction free text editor for writing up text without being distracted. We love the “black and green” terminal like interface, especially if you run the Chrome app fullscreen. Writer lets you download your writings to different formats or saves them to the cloud so you can continue editing them in another chrome browser.

And finally

With all the commotion about the Heartbleed exploit .. Install the Lastpass Chrome app and sort out your passwords once and for all.


Links.

Related Posts

Privacy Week : Tunnel traffic through your home network with Sshuttle.

Today’s tip in our “Privacy week” is geared a little bit towards the more advanced geek .. (Who am I kidding, you are ALL advanced Geeks here). In our every lasting quest to ensure our privacy when surfing on “foreign networks” like the one at work, the one at your dorm or the free wifi hotspot at Starbucks , we try to find more ways to make sure all your web traffic is encrypted and your privacy is kept safe.

kirk-and-spock-with-the-galileo

Enter SSHuttle ( NOOO , not the STAR TREK Shuttle) , A brilliant little transparent proxy application that directs ALL or PART of the network traffic from your trusty Linux or Mac machine (the laptop you use on the road) through an SSH tunnel to an SSH server of your choice (perhaps your own server at home). That way your traffic is completely (or partially) obscured from whoever is trying to sniff your traffic on an untrusted network. An added bonus is however that it is a transparent proxy ! This means your computer will actually think it is directly connected to the network where the SSH server is running. It is like running a very very very long cable through the internet straight from your machine to the network where your SSH server is located. 

So let’s start cooking.

Ingredients.

How to install SSHuttle on your client machine.

  • Install SSHuttle on your Linux machine using the command :  sudo apt-get install sshuttle
  • Install SSHuttle on your Mac by first installing HOMEBREW APP. (Installation instructions) and then typing brew install sshuttle

Shuttle is simple but VERY powerful.  It will create an encrypted tunnel between your laptop and the SSH server you setup at home. Depending on what kind of traffic you want to shove through that tunnel you can do different things like :

  • Just tunnel your browser traffic through the tunnel,
  • Shove all of your web traffic through the tunnel (including dns requests),
  • Shove ALL of your traffic through the tunnel.
  • Set up a “site 2 site” VPN  between the network you are working on and your network at home.
  • … and more crazy stuff.

So how does it work ? 

Once installed using SSHuttle is pretty simple. SSHuttle works from the command line and depending on the “switches” it will do different things for you. So on your client laptop , fire up your terminal and start typing.

  • sshuttle --dns -r username@yourremoteserver.com:2222 0/0

Enter the command above to push ALL of your traffic through the SSH tunnel towards your server at home. This is the example of running a virtual network cable THROUGH the internet towards your switch at home. All of your traffic is sent through this encrypted tunnel. USERNAME = A user you have created on your SSH server at home. YOURREMOTESERVER.COM = The external ip address (or Dynamic DNS name) of your home router. 2222 = The port on which you have your SSH server running. In this example I took a non-default port.

  • sshuttle  -r username@yourremoteserver.com:2222 192.168.0.0/24

With this command you can create a site to site VPN. Instead of typing 0/0 is going to send ALL the traffic through the tunnel. Typing the network range of your home network (in this case 192.168.0.0) tells SShuttle to send all the traffic that needs to go to the 192.168.0.0 domain through the tunnel, while sending out the rest of your traffic through  whatever network gateway you are connected to.  The /24 is your subnet mask ( you know , the 255.255.255.0 subnet number of your network).

There are a lot of other switches that you can use , but if you use the two commands we mentioned above you will have a LOT of power at your fingertips. I love using the second command. It allows me to connect to the exchange server at work for my work stuff, but also lets me quickly open up the web interface of my home router (on the LAN SIDE) to do some tinkering. SSHuttle is a very very nice tool that keeps you connected .. and keeps your privacy .. private.

Find out more about SSHUTTLE in this HAK5 episode.

Related Posts

Setting up your own SSH proxy on Windows.

Free wifi is great. It’s like finding an oasis in the middle of the desert that gives you the ability to quench your digital thirst before you wade into the offline sahara once again. But “Open and Free” wifi comes at a price. Being a shared network medium, it means that all traffic on the wireless network is visible to all users on that network , should they care to take a peak.

With networking tools like “Wireshark” it is fairly easy sniff traffic on an open wifi network and intercept all kinds of unencrypted traffic. That traffic can consist of what URL’s you surf to to what passwords you use (if you have an unsecured connection) .. They are all there for anyone to sniff, download and analyse.

To keep your browser traffic private all you need to do is encrypt it. One of the ways to do this is of course use https connections where you can, but if that is not possible there are alternatives. You can set up your own SSH proxy server. This means you will be creating an encrypted tunnel from your laptop, TROUGH the internet, to your home server. Once there (behind the security of your own firewall) your traffic heads for the internet. Its like surfing at home, but you are in fact ‘away from home’. 

The only thing you need are :

– Access over SSH to a linux server.  ( Check our our tutorial on how to set this up) 

– A copy of Firefox.

A copy of Putty.

putty-ssh-tunnel

Setting it up is quite easy , and we will probably do a screencast on the issue in season 8 of our podcast, but instead of boring you with a lot of text , we are going to point you to the excellent podcast episode Kurtis Adkins did for Hacker Public Radio on the topic. Take 20 minutes and listen carefully. When you are done (and have the ingredients above) you will be able to secure your webtraffic from anyone who wants to snoop around. (Hackers, scriptkiddies or nosy sysadmins) 

Link : Curtis Adkins on : Setting up and using SSH and SOCKS (Hacker public Radio ep 1422)

Related Posts