
Introduction : Writing is hard.
Writing a book is hard, but actually making and publishing an eBook doesn’t have to be. Here’s an easy way to take your finished text and turn it into eBooks for popular devices and Kindles using nothing but free and open source software! I can vouch that it works, because I’ve done this twice. I’ll do it a third time when this current book is finished.
Things You Need & Things You Need To Do
Let’s Download Things!
You’re going to need two free and open source applications and a free and open source plugin. The great thing is that all of them are platform independent, so no matter if you’re running Windows, OS X, or Linux; you’ll be able to make your eBook a reality.
First, you’ll need LibreOffice, a free and open source office suite similar to Microsoft Office. OpenOffice will do the job too, but I prefer LibreOffice. Pick the one that you like. Second, you’re going to need Calibre, which is also a free and open source application. Calibre is an eBook manager, database, content server, and more importantly, eBook format converter. The plug-in you’ll need is for LibreOffice and it’s called Writer2ePub and that’s an apt description of what it does.
Download and install LibreOffice and Calibre or snag them from your repositories. Once LibreOffice is installed, you should be able to double click and install Writer2ePub as your OS will recognize that as a LibreOffice plugin. Installation is quick and easy and soon you’ll be up and running with some prime software to make an eBook.
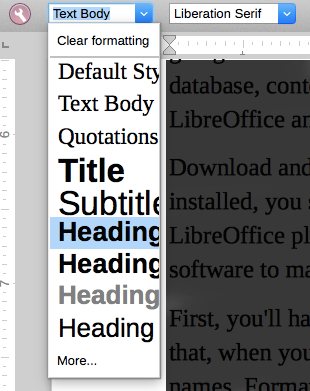
First, you’ll have to write that eBook, and I can’t give you help on that here. I do suggest that, when you’re formatting your book in LibreOffice, make use of the Heading 1 style for your chapter names. Formatting and design is a thing for another post but using the Heading 1 style for your chapter names will be important because Writer2ePub automatically builds a table of contents for you, based off those Heading 1 style calls. If you don’t have chapters then that’s fine. You don’t have to worry about the style selection at all, unless you want to!
Once you’re done organizing and setting your chapter styles, you’re ready to go! Obviously, make whatever edits you think you need for your finished book, but when you’re ready to pull the trigger click the Writer2ePub icon on your LibreOffice toolbar. You’ll actually see three of them. The first builds your eBook; the second handles your metadata which includes title, author, cover, and description; and the third is preferences. You can set preferences as you like, but for now, let’s set our metadata. So click the Writer2ePub icon with a little blue i on it and set up your metadata as appropriate.
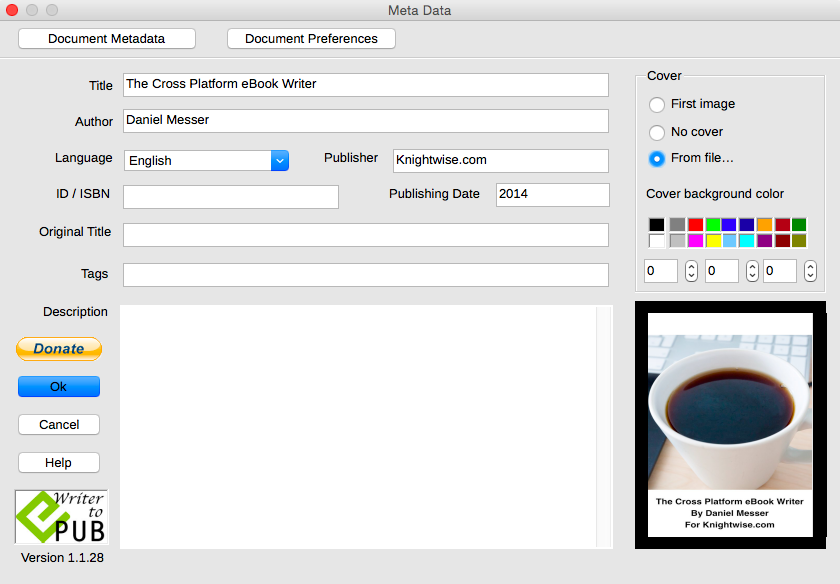
You should add a cover because, as a professional librarian, I can tell you that people judge books by their covers, cliches notwithstanding. eBook design is a thing all its own, but your cover should be a high quality image, at least 500 x 800 and 72 pixels per inch. I use an image that’s 625 x 1,000 and 100 pixels per inch. The preferred maximum size for the longest side is usually 2,000. So edit your image accordingly. That stuff set, you can continue editing and tweaking as needed. If you save the file, your metadata saves with it.
Are you ready to make an eBook? Excellent! Time to click the Writer2ePub icon on the LibreOffice toolbar! You’ll have one more opportunity to edit your metadata and then click Ok. LibreOffice and Writer2ePub will work for a few moments and, at first, it looks like nothing happened. Ah! But check the folder where you’ve saved your original LibreOffice file and you will find an ePub there by the same name!
Congratulations! You just created an eBook!
Lets make a Kindle book too !
The eBook you just created using Writer2ePub and LibreOffice is in ePub format. That format will work on almost everything out there from tablets to eReaders. It will not, however, work on a Kindle eInk. If we’re talking about a Kindle Fire, then users of the Fire can get apps to open ePub files. That’s fine, but Kindle eInk users can’t get apps for their device, so let’s make sure they can read our eBook too, and that’s where Calibre comes in!
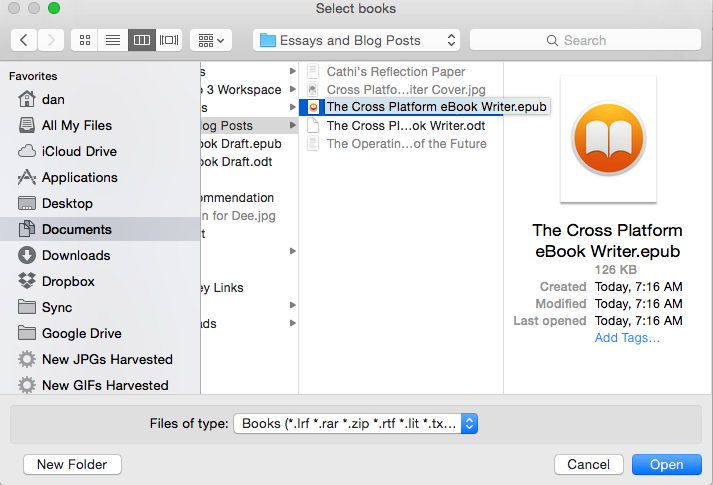
Open up Calibre and import your newly created ePub. Don’t worry, because Calibre copies all imported eBooks to the library folder you select. So your original remains untouched.
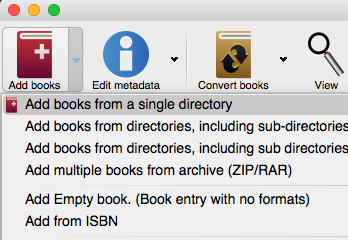
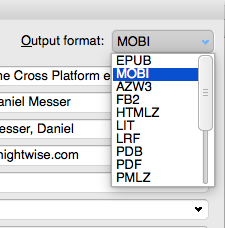
Once it’s imported into Calibre, right click the item and select Convert Books – Convert Individually. You’ll get a screen with a bunch of options. Set those as you like but your interest probably lies near the top left of the screen where it says Output format
Select MOBI from that list and click Ok. Calibre will run the conversion and let you know when it’s finished.
If you click your book again and look over the right sidebar, you’ll see your cover, author, formats, and path. Next to path is a link that says Click to open. Do that, and you’ll get the directory with your imported ePub and newly created mobi file! That mobi file is perfectly compatible with Kindle eInk devices.

And that’s it! You’ll have your eBook in the two most popular formats for devices and eReaders. If you’re looking to upload your book to a site like Amazon or Barnes & Noble, check to see which format they prefer, though Amazon will most certainly need the mobi format.
Happy writing! Make your eBook happen!
Post by Daniel Messer.