


Review : Samsung Level headphones. Bling or Brilliant ?
Jan 05When Samsung asked us to review their line of “level” headphones we were a little skeptical. Headphones are back ! They are the high tech fashion statement – sound producing ear warmer of many hipster these days. It was only yesterday we relied exclusively on discrete form fitting ear-buds for our audio entertainment. Today it are the big over-sized headphones whose primary function seems to be to match our outfits/social-subculture and prominently display their brand logo’s on the side of our heads. The trouble here is that with all the attention going to the “looks” of your headphones, few (despite their exuberant prices) actually produce good audio. After traumatic experiences with a pair of Dr Dre headphones (They produce so much base they make a Vivaldi concert sound like Tomorrowland) we were skeptical for Samsungs products .. so we tried them on.

The Samsung “level on” headphones.
The Samsung “level on” headphones are ‘on’ your ears. A hard plastic bridge with foldable legs make the headset feel very sturdy and decent. The leather padding both on the earmuffs and underneath the “bridge” has a soft, high quality feel to it. The phones have a 3.5mm mini-jack connector for your cable so you can interchange the cables should they break (a problem with many headphones) or should they not match the color of your underwear (it happens !)
The Level on’s are slightly heavier then your regular run of the mill headphones, but the overall distribution of the weight when you have them on makes them feel very very comfortable. The leather on the earmuffs is very soft and there is hardly any noticeable pressure on your ears when wearing the set. A great bonus is that it warms up immediately to the body temperature of your ears making the entire headset a natural extension of your body.
Enough about the ergonomics : How do they SOUND ? Well , they sound amazing ! The audio is warm, crisp and “correct” . No over-boosting of non existing low range audio. Just a clear , well represented audio spectrum being pumped into your ears. We loved them (even after wearing them for 3 hours straight we found no signs of ‘headphone fatigue” or worse “sweaty ears”.
Looks ? They are white ! Just like with Dr Dre’s people will see you wearing them from 2 blocks away. Deal with it. (But they are also available in black … so deal with that too !)
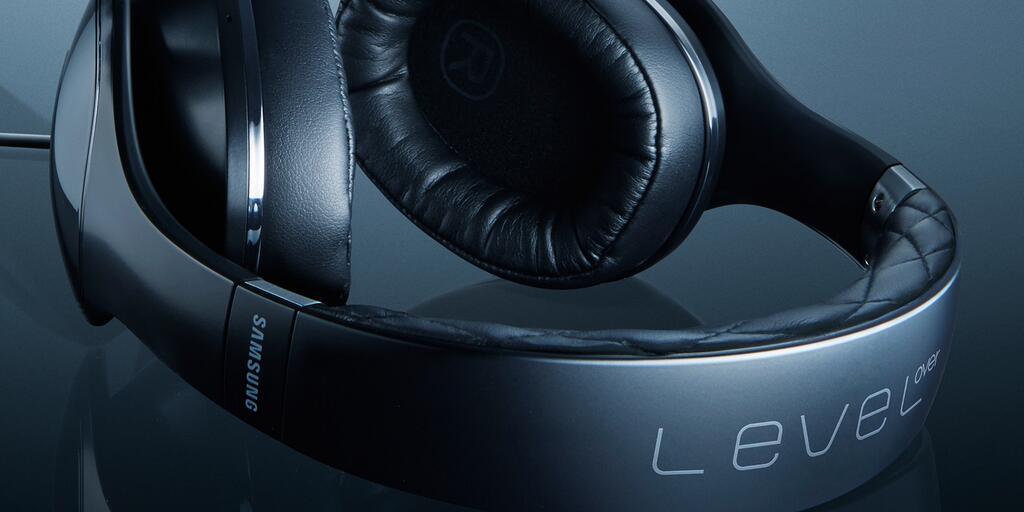
The “level over” headphones.
The level OVER headphones go OVER your ears. The leather padding on the larger ‘cups” surrounds your ear and presses against your head , completely surrounding your ears and ‘isolating’ you from the rest of the world. Part of this is due to the excellent padding , the other part is because the level ‘overs’ are active noise cancelling headphones. They pick up noise from around you and send “anti noise” through the speakers so you can’t hear the noise. This means you will have to charge the headphones from time to time. Added functionality is the fact that you can use them as stand alone Bluetooth speakers so you don’t need a wire. But as a little bit of an audiophile we could not bring ourselves to use this functionality. The audio we wanted to test had to be as clear as possible so we went via the “analog wire”.
Using the “level overs” is like stepping onto the surface of the moon .. and then hitting play. The sound is warm, its everywhere, its crystal clear and there is no residual noise from around you. Samsung charges top dollar for these things but they are probably worth their price. Short of using duct tape this is the best way to drown out the noise of nagging kids and enjoying your favorite tunes. For the hefty price you might also be able to book a weekend cottage in the woods .. but when you get back from that you still don’t have any decent headphones.
Conclusion.
Audio isn’t Samsung’s core business and these baby’s are no Sennheisers … but we are very happy that the Chinese company DID focus their attention on the quality comfort and AUDIO part of these headphones. This is not fancy overpriced bling .. the Level line does what it is required to do : Produce a very good headphone experience.
Prices :
Samsung Level on : 165 USD (amazon)
Samsung Level over : 310 USD (amazon)
Samsung Level headphones (Site)
Related Posts
Building a simple Offsite backup server with an EEEpc and Bittorrent Sync.
Jan 04Some gadgets are just hard to throw out. Perhaps you keep hanging on to them because you have this plan of “using them someday” for “some project”. Perhaps you keep hanging on to them because of nostalgia. Whatever reason you might choose, those geeky gadgets that keep occupying that box in your office aren’t getting any younger. Why not put them to good use ?
Lets take 2 items in MY junk-box as an example. An aging Asus EEE 701 Netbook PC that I have been hanging onto because of sentimental reasons. (I smuggled it in from the US way before these babies were available in Belgium) Its keyboard is broken and its low specs when it comes to storage, memory and cpu power aren’t helping it in finding something useful to do these days. The second item is my first 1tb external hard drive. I haven’t thrown this one out because its on my ‘for-some-project-some-day’ list. Its been on the list for 2 years now … So lets smash them together and turn them into a Remote backup solution using open source software and Bittorrent technology.
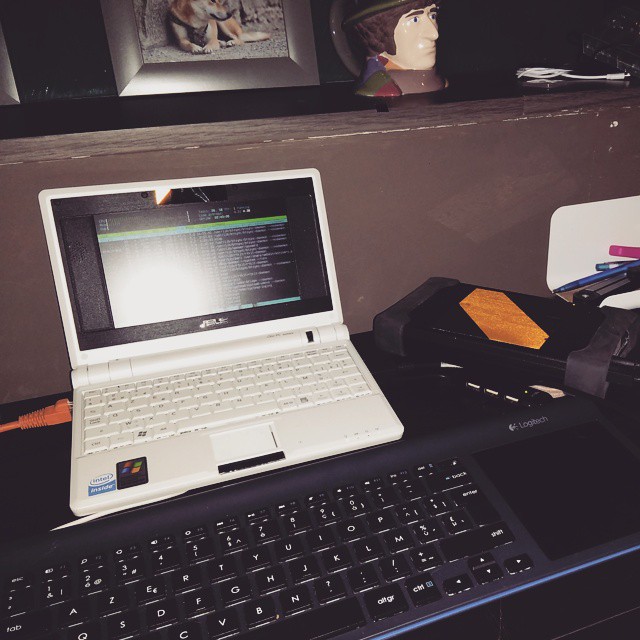
Step 1 : Turn the EEEpc into a headless server.
I downloaded the Image for Ubuntu’s ‘minimal installer’ off the net and have had it kicking around on an old USB stick for a while now. Because of its small footprint its ideal to do ‘light’ installations of Ubuntu because you can choose which components you want to install. I chose the ‘minimal Ubuntu server’ and the SSH server component. When the installation was complete I rebooted the laptop and hooked up the external USB drive (that I had formatted in one big FAT32 partition)
Step 2 : Install Webmin and mount the drive.
Because I was going to use my external hard drive to store my remote backups on (the EEEpc doesn’t have enough storage) I needed to be sure it was always mounted correctly if my little laptop should have to reboot. So instead of messing around with stuff like FStab config files I installed Webmin. (a Web-based interface to your Linux server). Using the ‘Disk and network file system’ menu I mounted the external drive into a folder called ‘backup drive’ that I had created in my home directory. This way I was sure that the external drive was always mounted correctly in the same folder.
Links : Howto install Webmin.
Step 3 : Install Bittorrent Sync.
Next up I installed a copy of Bittorrent Sync both on my local server and on the old eeePc. Following THIS tutorial lets you install Bittorrent Sync and configure the Web interface to be accessible from all over your network. (So make sure you choose a very secure administrator password). When installing Bittorrent sync this way, you are also sure the service always starts up when your computer reboots.
Links : Howto install Bittorrent sync.
After the installation was complete I surfed to the Bittorrent web interface of my home server (source system) in one tab, and to that of my EEEpc (remote destination system) on another one.
Step 4 : Share a folder on your Source system.
Now it was pretty smooth sailing. On the Bittorrent web interface of my SOURCE machine I made a bittorrent share of each folder I wanted to backup remotely. I right clicked “properties” once the folder was created and copied the ‘READ ONLY’ secret.
Step 5 : Enter the key for the shared folder on your remote destination system.
Next up I went to the tab of my ‘remote destination system’ and entered the READ ONLY key. I selected a folder on my external drive where the files needed to be synced towards. (in my /home/backupdrive/ directory)
Step 6 : Do the initial copy
After repeating the process above for all the folders I wanted to ‘sync remotely’ I just had to wait for the initial copy to complete. After that it was time to pickup the EEEpc and the External drive and bring them to their new (remote) home. I hooked the EEEpc up to the network, started up the machine and … that was that … headless remote backup solution done.
Epilogue.
Because Bittorrent sync doesn’t care about open ports or anything I didn’t have to mess with the router on the remote end of my backup solution. There were no ports to forward and even a static IP was not required for the remote machine. Just connect it , fire it up and .. boom. Using the ‘read only’ secret is an insurance that changes to my files are only synced one way : From the source to the remote system (and never the other way around).
You can expand this setup (and increase the security at the remote end) by syncing over encrypted ZIP files. That way people can’t access the data should your system be compromised.
In the end its a great simple way to use an old system (you can even use an old laptop with a broken screen for this) and give it a new lease on life. The setup is simple, the interfaces are web based and the whole setup is perfect for a remote backup destination at your parents or in laws.
So secure your data and put those old clunkers back in action !
Related Posts
kw905 : Life on a Chromebook.
Jan 01We deep dive into the world of Chromebooks and find an answer to the question : Can you survive on a Chromebook. We walk you through the possibilities and limitations of the Chromebook. We enlighten you on how to use it for work, connect back to your home network and how to use your Chromebook to entertain you. If thats not enough we go beyond the design specifications and sideload Linux on your Chromebook turning into a low budget sliders dream machine. All of that and more .. in Kw905 : Life on a Chromebook. Catch the live recording of this podcast in the Youtube video below and see if you can catch Sulu the dog as our Podcast assistant.
Shownotes.
- The Acer C730
- First impressions
- Hardware – Software
- Taking the Chromebook to work (Article)
- Using the Chromebook to entertain you (Article)
- Connecting back to your home network via a Socks5 proxy over SSH (Article)
- Dual Booting your Chromebook with Linux (Distroshare.com)
- Sideloading your Chromebook with Crouton (Youtube instruction video)
- Epilogue